We are living in the era of blockchain and AI mass adoption. For beginners building in solana blockchain might feel quite complex and unknown. As a human being, we’re scared of the unknown as well as more drawn to the adventure that comes with it. To most people, solana is really complex black hole because it requires a lot of pre-requisites like learning rust, understanding the new solana blockchain and also the core mechanism of how it all works together. Most people are too used to Ethereum or EVM compatiable L2s. so solana seems tapping into a whole another universe. What if I told you that in the next two hours, we will cover some core solana concepts and you’ll build and deploy your own token in solana?
Now you might ask why are we starting with the concept of a token? well, every major defi protocol started with someone creating their first token. SOL, USDC, JUP - all of these token began with the same fundamental concepts which we’ll learn in this tutorial. We will start from complete basics and then we’ll build something real, which you can actually send to your friends.
When we finish this tutorial we’ll have deployed a working solana program that can mint tokens. More importantly we’ll cover the foundation or some really amazing defi concepts.
What is Solana? Understanding the Foundation
Imagine our own traditional bank worked in a way where every single transaction was instantly visible to everyone, not possible to fake or manipulate and processed without a single person in charge. No CEOs or leaderships making decisions about your money, no mysterious delays on processing and no need to put in trust in anyone just pure mathematical equations making sure that everything just works as its supposed to. Well, that’s the fun part of blockchain and solana.
You might want to ask, why solana and not ethereum? Well, ethereum is like sending mail through old boomer mail service, reliable but slow and expensive but when you use solana, it’s more like genZ spreading informations with super delivery service that just basically cost pennies.
Ethereum is more like 15 transactions per second, $5-$50+ fees during busy periods and takes 1-5 minutes to confirm. But for solana it’s 65000 transactions per second, normally under $0.01 per transaction and takes around 1-2 seconds to confirm.
The difference isn’t just a normal simple nice to have difference, it actually brings the opportunity for entirely new types of applications that simpley wouldn’t exist on slower and high fee chains.
The Accounts Model: A Different Way of Thinking
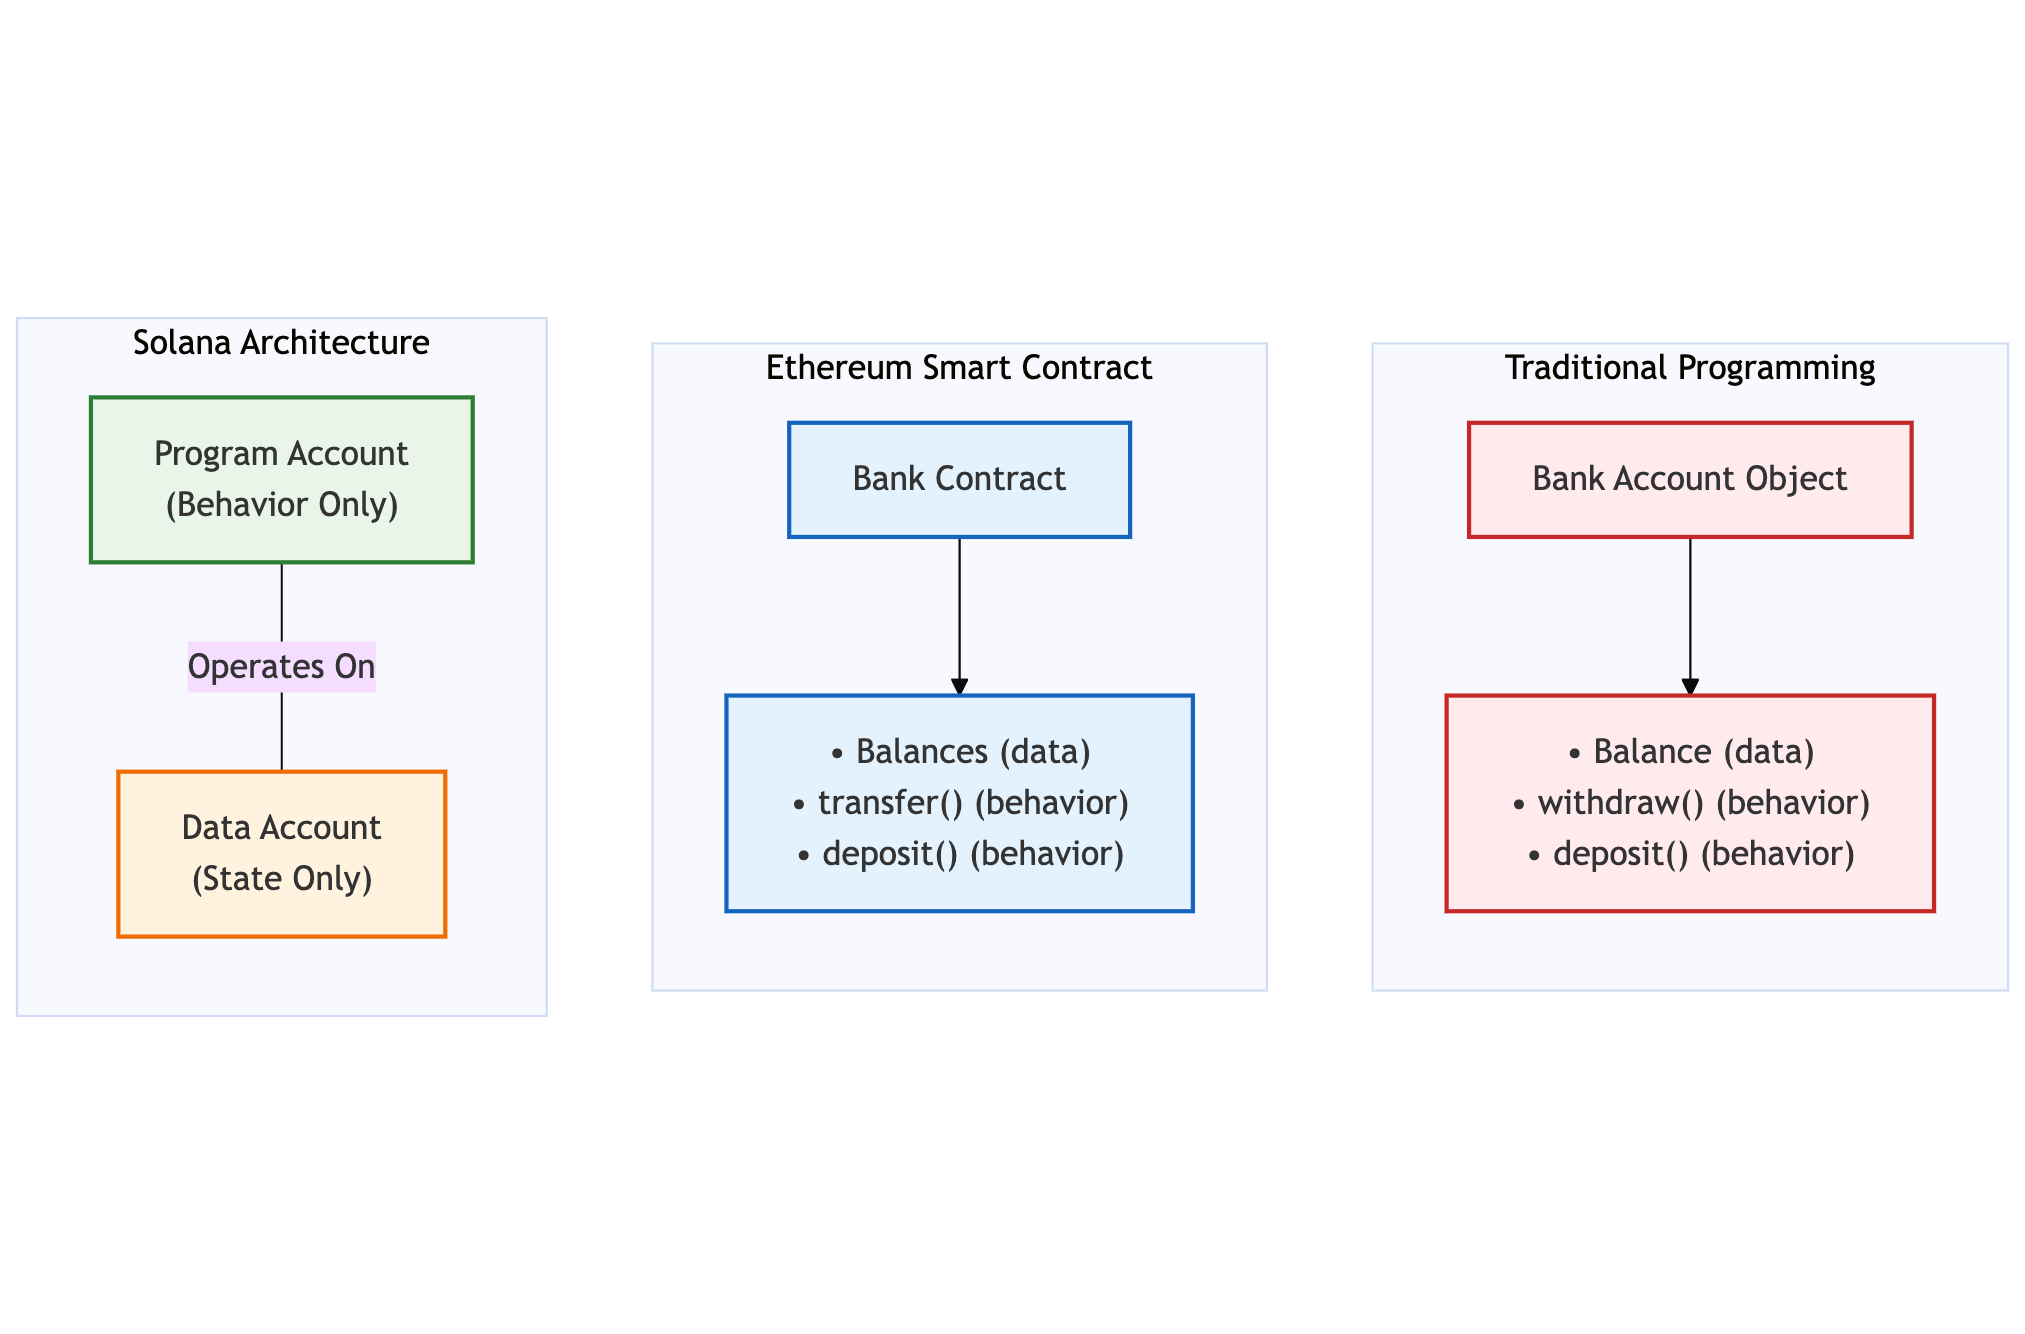
In traditional programming when we create objects that contain both data and methods and bundle them together. Let’s think of an example of bank account, to create a bank account object will contain it’s own balance and data with methods like withdraw() and deposit() which can operate in some specific instance. This approach kinda creates predictable, isolated units where each objects end up managing it’s own state and logic independently. While this specific model actually works for many applications but it can lad to duplicated efforts whn you need multiple objects with same objects, just like every bank account has withdraw() and deposit() logic even though these are identical across all bank accounts. Encapsulation is bundling data and methods together inside an object, more like putting everything that is related for example: bank account (balance + withdraw/deposit functions) in one container. This encapsulation provides a clear boundary and ownership but scaling also requires creating a bunch of independent objects while each carries bundled functionalities.
Bundling data and methods together inside an object, like putting everything related to a bank account (balance + withdraw/deposit functions) in one container.
Ethereum also adapted this object-oriented model for blockchain by creating smart contracts which combine state variables and functions inside single deployed units. Each Bank Contract maintains its own balances mapping while having the transfer() and deposit() functions inside that are needed to modify that state.
This approach enabled the revolutionary concept of programmable money and decentralized applications, bringing computation to blockchain in a familiar paradigm. However, the bundled architecture leads to significant inefficiencies at scale - thousands of token contracts exist with nearly identical logic, each requiring separate deployment and gas costs. Additionally, upgrading contract logic becomes complex, often requiring proxy patterns or complete redeployment, since the code and state are tightly coupled within each contract instance.
But Solana revolutionizes blockchain architecture by totally separating logic from data, creating a Program Account that contains pure behavior and Data Accounts that store only state. Programs are stateless, reusable utilities that can operate on unlimited accounts, similar to how a city's electrical grid serves countless buildings without duplication. This separation of logic from data creates efficiency because one SPL Token Program handles every token transfer on Solana, from USDC to meme coins, reducing the need for unnecessary contract deployments. The architecture also creates modularity and upgrades as programs can instantly work with any compatible account, and any sort of improvements to core programs benefit the entire ecosystem immediately. Users maintain control through cryptographic signatures while programs provide the standardized logic, creating a scalable foundation that grows more powerful as adoption increases.
Rust Data Types: The Foundation of Safe Programming
Now that we understand the account model of solana’s core concept, let’s dive into some rust concepts to get started with hands on coding.
Let's start with the basics. In Rust, variables store different types of data:
// Numbers (integers)
let my_age: u32 = 25;           // Unsigned 32-bit integer (0 to 4 billion)
let token_amount: u64 = 1000;   // Unsigned 64-bit integer (for large numbers)
let temperature: i32 = -10;     // Signed integer (can be negative)

// Text
let name: String = "Alice".to_string();  // Owned text (you can modify it)
let symbol: &str = "ALICE";              // Borrowed text (read-only reference)

// True/False
let is_minting_enabled: bool = true;

// Optional values (might exist, might not)
let maybe_symbol: Option<String> = Some("ALICE".to_string());
let nothing: Option<String> = None;
Let’s break down each of these and try to understand why these are important for building secure blockchain applications.
let my_age: u32 = 25;           // Unsigned 32-bit integer (0 to 4 billion)
let token_amount: u64 = 1000;   // Unsigned 64-bit integer (for large numbers)
These are unsigned integers, which means these numbers can only be positive (0 or greater) which means no negative sign allowed.
In blockchain concepts, token amount should never be negative and account balance are always positive. This concept also prevents underflow attack which means if someone tries to withdraw more than they have then rust will panic instead of wrapping to a huge positive number.
let temperature: i32 = -10; // Signed integer (can be negative)
There are times when you might need negative numbers, for example: temperature, price differences or for any value that can go below zero. Tracking profits or loss in trading where you might get negative returns that’s where the signed integer comes in.
let name: String = "Alice".to_string();  // Owned text (you can modify it)
let symbol: &str = "ALICE";              // Borrowed text (read-only reference)
This is one of the most important concept in rust. String (owned) means you own this text already, you can modify it, add characters and change it. It also requires more memory bcause it’s completely yours.
But &str means you’re just looking at th text that owned by someone else. You can only read it but can’t modify it and it’s also more memory efficient because you’re not copying the whole thing.
let is_minting_enabled: bool = true;
Boolean is the most simple but important concept. This prevents confusion between "false" and "0" or "true" and "1" that causes bugs in other languages.
let maybe_symbol: Option<String> = Some("ALICE".to_string());
let nothing: Option<String> = None;
This is how rust mostly handles “might exist”, “might not” situations safely. In other programming languages “nothing” is represented by null and that can cause the program to crush when you try to us it but rust explicitly makes you handle both cases.
Here’s an example in terms of blockchain:
// Token might have a symbol, might not
let token_symbol: Option<String> = get_token_symbol();

// Must explicitly handle both cases
match token_symbol {
    Some(symbol) => println!("Token symbol: {}", symbol),
    None => println!("Token has no symbol"),
}

// Can't accidentally use None as if it were a real value
This prevents the "null pointer exceptions" that have caused countless crashes and security vulnerabilities in other languages.
Rust's type system prevents you from accidentally treating a number like text or vice versa. This might seem strict, but it prevents bugs that cost DeFi protocols millions.
Structs: Custom Data Types in rust
// Think of this like a form with required fields
struct Person {
    name: String,     // Text field
    age: u32,         // Number field
    email: String,    // Another text field
}

// Creating an instance (filling out the form)
let alice = Person {
    name: "Alice".to_string(),
    age: 25,
    email: "alice@example.com".to_string(),
};

// Accessing fields
println!("Name: {}", alice.name);  // Prints: Name: Alice
Structs let you group related data together, like filling out a form. In Solana development, structs represent the data you store on the blockchain.
Let’s understand it a bit more, structs are one of the rust’s most powerful features for organizing data. You can think of them as custom blueprints for creating related informations together, kind of like designing a form that groups all the fields you need.
// Think of this like a form with required fields
struct Person {
    name: String,     // Text field
    age: u32,         // Number field
    email: String,    // Another text field
}
Similar to a form, over here think of it as a job application. It asks you to submit your name (text), age (number), and email (text). You can't submit the form unless you fill out all fields correctly.
// Creating an instance (filling out the form)
let alice = Person {
    name: "Alice".to_string(),
    age: 25,
    email: "alice@example.com".to_string(),
};
Now let’s take a look at what’s happening here, we’re creating a specific prson using the struct blueprint from before. We are providing values for every field and each field must match the type specified in the struct. Because won’t let us skip fields or us wrong types.
// Accessing fields
println!("Name: {}", alice.name);  // Prints: Name: Alice
println!("Age: {}", alice.age);    // Prints: Age: 25
println!("Email: {}", alice.email); // Prints: Email: alice@example.com
We can also use dot notation to read/access specific fields. There’s also nested structs and even optional fields with Option<T>.
Functions and Error Handling
Functions in Rust can succeed or fail, and Rust forces you to handle both cases:
// A function that might fail
fn divide(a: f64, b: f64) -> Result<f64, String> {
    if b == 0.0 {
        Err("Cannot divide by zero".to_string())  // Error case
    } else {
        Ok(a / b)  // Success case
    }
}

// Using the function
match divide(10.0, 2.0) {
    Ok(result) => println!("Result: {}", result),
    Err(error) => println!("Error: {}", error),
}

// The ? operator (shortcut for error handling)
fn safe_calculation() -> Result<f64, String> {
    let result1 = divide(10.0, 2.0)?;  // If this fails, return the error
    let result2 = divide(result1, 4.0)?;  // Otherwise, continue
    Ok(result2)  // Return the final result
}
This explicit error handling prevents the "silent failures" that plague other languages.
Let’s take a closer look:
// A function that might fail
fn divide(a: f64, b: f64) -> Result<f64, String> {
    if b == 0.0 {
        Err("Cannot divide by zero".to_string())  // Error case
    } else {
        Ok(a / b)  // Success case
    }
}
Result<f64, String> function returns either the success or failure but never both. So in case of successful you get f64 a floating-point number and if it fails then the error message with String . But there’s also two possible outcomes Ok(a / b) wraps the successful result and the other if fails.
// Using the function
match divide(10.0, 2.0) {
    Ok(result) => println!("Result: {}", result),      // Handle success
    Err(error) => println!("Error: {}", error),       // Handle failure
}
Over here match forces to handle both based and matches pattern and unwraps automatically the value from Ok() or Err() .
The ? operator is the shortcut for error handling.
What is Anchor? Making Solana Development Human-Friendly
Raw Solana development is incredibly powerful but also incredibly complex. Creating a simple account requires understanding low-level blockchain concepts and writing 50+ lines of boilerplate code.
Anchor is like having a skilled translator who converts your high-level intentions into the complex Solana operations needed.
Let's get your development environment ready. We'll install each tool and understand what it does:
Installing Rust
# Install Rust (the programming language)
curl --proto '=https' --tlsv1.2 -sSf https://sh.rustup.rs | sh

# Restart your terminal or run:
source ~/.cargo/env

# Verify installation
rustc --version
cargo --version
What this gives you:
rustc: The Rust compiler (converts your code to machine code)cargo: Rust's package manager and build system (like npm for JavaScript)
Installing Solana CLI
# Install Solana command-line tools
sh -c "$(curl -sSfL https://release.solana.com/v1.18.17/install)"

# Add to your PATH (exact command depends on your shell)
export PATH="/home/username/.local/share/solana/install/active_release/bin:$PATH"

# Verify installation
solana --version
What this gives you:
solana: Connect to Solana networks (devnet, testnet, mainnet)solana-keygen: Create wallet keypairssolana program deploy: Deploy your programs
Installing Anchor
# Install Anchor CLI
cargo install --git https://github.com/coral-xyz/anchor anchor-cli --locked

# Verify installation
anchor --version
What this gives you:
anchor init: Create new Anchor projectsanchor build: Compile your Solana programsanchor test: Run testsanchor deploy: Deploy to Solana
Setting Up Your Development Wallet
# Create a new keypair for development
solana-keygen new --outfile ~/.config/solana/id.json

# Set Solana to use devnet (free test tokens)
solana config set --url devnet

# Check your configuration
solana config get

# Get your wallet address
solana address

# Get free test SOL for development
solana airdrop 2
Important: This wallet is for development only. Never use these keys for real funds!
What We're Building: My Token Program
The My Token program is a centralized authority token system that demonstrates core Solana programming concepts. While it's educational in nature, it provides a solid foundation for understanding how tokens work on Solana at a low level.
Key Features:
- ✅ Custom token creation with name and symbol
- ✅ Controlled minting by token authority
- ✅ Overflow protection and security checks
- ✅ Comprehensive testing suite
- ✅ Live deployment on Solana devnet
Program ID: 5ikZo3dXp81Mj9qDegbGNeMJBtzu1DSw6UeZK8o3XKgs
View on Solana Explorer | GitHub Repository
Creating Your First Anchor Project
Let's start by creating the project structure:
# Create a new Anchor project
anchor init my-token
cd my-token

# Explore the project structure
ls -la
You'll see this clean structure that Anchor generates:
my-token/
├── Anchor.toml          # Project configuration
├── Cargo.toml          # Rust package configuration
├── programs/           # Your Solana programs
│   └── my-token/
│       └── src/
│           └── lib.rs  # Your main program code
├── tests/              # JavaScript tests
└── target/             # Compiled programs
Understanding Solana Program Architecture
Before diving into code, let's understand how Solana programs work. Unlike Ethereum smart contracts that maintain state internally, Solana programs are stateless. All data is stored in separate accounts, and programs simply process instructions that operate on these accounts.
Think of it this way:
- Programs = The logic (like functions)
- Accounts = The data storage (like databases)
- Instructions = Function calls with specific accounts
This architecture enables Solana's parallel processing capabilities, contributing to its high throughput.
Building the Token Program
Now let's replace the default template with our token creation logic. Open programs/my-token/src/lib.rs:
use anchor_lang::prelude::*;

declare_id!("5ikZo3dXp81Mj9qDegbGNeMJBtzu1DSw6UeZK8o3XKgs");

#[program]
pub mod my_token {
    use super::*;

    pub fn create_token(ctx: Context<CreateToken>, name: String, symbol: String) -> Result<()> {
        // Get a mutable reference to our token config account
        let token_config = &mut ctx.accounts.token_config;

        // Set the authority (who controls this token)
        token_config.authority = ctx.accounts.user.key();

        // Set token metadata
        token_config.name = name;
        token_config.symbol = symbol;
        token_config.total_supply = 0;  // Start with zero tokens

        msg!("Token '{}' ({}) created successfully!", token_config.name, token_config.symbol);
        Ok(())
    }

    pub fn mint_tokens(ctx: Context<MintTokens>, amount: u64) -> Result<()> {
        let token_config = &mut ctx.accounts.token_config;

        // Security check: only the authority can mint tokens
        require!(
            token_config.authority == ctx.accounts.authority.key(),
            ErrorCode::Unauthorized
        );

        // Security check: prevent amount from being zero
        require!(amount > 0, ErrorCode::InvalidAmount);

        // Safe math: prevent integer overflow
        token_config.total_supply = token_config.total_supply
            .checked_add(amount)
            .ok_or(ErrorCode::Overflow)?;

        msg!("Minted {} tokens. Total supply: {}", amount, token_config.total_supply);
        Ok(())
    }
}

// Define what accounts the create_token function needs
#[derive(Accounts)]
pub struct CreateToken<'info> {
    #[account(
        init,                           // Create this account
        payer = user,                   // User pays for account creation
        space = 8 + TokenConfig::SPACE  // How much storage space to allocate
    )]
    pub token_config: Account<'info, TokenConfig>,

    #[account(mut)]  // mut = mutable (balance will decrease due to rent payment)
    pub user: Signer<'info>,

    pub system_program: Program<'info, System>,
}

#[derive(Accounts)]
pub struct MintTokens<'info> {
    #[account(mut)]
    pub token_config: Account<'info, TokenConfig>,
    pub authority: Signer<'info>,
}

// Define the data structure for our token
#[account]
pub struct TokenConfig {
    pub authority: Pubkey,    // Who can mint new tokens (32 bytes)
    pub name: String,         // Token name (4 + string length bytes)
    pub symbol: String,       // Token symbol (4 + string length bytes)
    pub total_supply: u64,    // How many tokens exist (8 bytes)
}

impl TokenConfig {
    pub const SPACE: usize = 32 + 4 + 32 + 4 + 8 + 8; // Pubkey + String + String + u64 + discriminator
}

// Custom error types
#[error_code]
pub enum ErrorCode {
    #[msg("You don't have permission to mint tokens")]
    Unauthorized,
    #[msg("Amount must be greater than zero")]
    InvalidAmount,
    #[msg("Number overflow")]
    Overflow,
}
Breaking Down the Code
Let me explain the key components that make this program work:
Program Declaration:
#[program]
pub mod my_token {
    // All your program functions go here
}
The #[program] attribute tells Anchor this module contains your program's instruction handlers.
Token Creation Function:
pub fn create_token(ctx: Context<CreateToken>, name: String, symbol: String) -> Result<()>
This function creates a new token by:
- Taking the token name and symbol as parameters
- Initializing a new account to store token configuration
- Setting the caller as the token authority
Security in the Minting Function:
require!(
    token_config.authority == ctx.accounts.authority.key(),
    ErrorCode::Unauthorized
);
This is crucial - without this check, anyone could mint unlimited tokens! Always verify permissions in blockchain programs.
Creating Comprehensive Tests
Testing is absolutely critical in blockchain development. One bug can cost millions. Let's create a thorough test suite in tests/my-token.ts:
import * as anchor from "@coral-xyz/anchor";
import { Program } from "@coral-xyz/anchor";
import { MyToken } from "../target/types/my_token";
import { expect } from "chai";

describe("my-token", () => {
  anchor.setProvider(anchor.AnchorProvider.env());

  const program = anchor.workspace.MyToken as Program<MyToken>;
  const provider = anchor.AnchorProvider.env();
  const tokenConfig = anchor.web3.Keypair.generate();

  it("Creates a token", async () => {
    const tx = await program.methods
      .createToken("Alice Coin", "ALICE")
      .accounts({
        tokenConfig: tokenConfig.publicKey,
        user: provider.wallet.publicKey,
        systemProgram: anchor.web3.SystemProgram.programId,
      })
      .signers([tokenConfig])
      .rpc();

    console.log("Token creation transaction:", tx);

    // Verify the token was created correctly
    const tokenConfigAccount = await program.account.tokenConfig.fetch(
      tokenConfig.publicKey
    );

    expect(tokenConfigAccount.name).to.equal("Alice Coin");
    expect(tokenConfigAccount.symbol).to.equal("ALICE");
    expect(tokenConfigAccount.totalSupply.toNumber()).to.equal(0);
    expect(tokenConfigAccount.authority.toString()).to.equal(
      provider.wallet.publicKey.toString()
    );
  });

  it("Mints tokens", async () => {
    const mintAmount = 1000;

    const tx = await program.methods
      .mintTokens(new anchor.BN(mintAmount))
      .accounts({
        tokenConfig: tokenConfig.publicKey,
        authority: provider.wallet.publicKey,
      })
      .rpc();

    console.log("Token minting transaction:", tx);

    // Verify the total supply increased
    const tokenConfigAccount = await program.account.tokenConfig.fetch(
      tokenConfig.publicKey
    );
    expect(tokenConfigAccount.totalSupply.toNumber()).to.equal(mintAmount);
  });

  it("Prevents unauthorized minting", async () => {
    const unauthorizedUser = anchor.web3.Keypair.generate();

    try {
      await program.methods
        .mintTokens(new anchor.BN(100))
        .accounts({
          tokenConfig: tokenConfig.publicKey,
          authority: unauthorizedUser.publicKey,
        })
        .signers([unauthorizedUser])
        .rpc();

      expect.fail("Should have thrown an error");
    } catch (error) {
      expect(error.toString()).to.include("Unauthorized");
    }
  });
});
Building and Testing Your Program
Time to see if our code works! Run these commands:
# Install dependencies
yarn install

# Build the program
anchor build

# Run tests
anchor test
If everything works correctly, you should see:
  my-token
    ✓ Creates a token (234ms)
    ✓ Mints tokens (187ms)
    ✓ Prevents unauthorized minting (156ms)

  3 passing (1s)
Deploying to Solana Devnet
Now for the exciting part - deploying your program to Solana's devnet where others can interact with it!
Step 1: Configure Solana CLI
# Switch to devnet
solana config set --url devnet

# Generate a new keypair (if you don't have one)
solana-keygen new

# Check your balance
solana balance
Step 2: Get Some Devnet SOL
# Request 2 SOL from the devnet faucet
solana airdrop 2
Step 3: Deploy Your Program
# Build for deployment
anchor build

# Deploy to devnet
anchor deploy --provider.cluster devnet
You'll see output like:
Deploying cluster: https://api.devnet.solana.com
Upgrade authority: YourWalletAddress...
Deploying program "my-token"...
Program Id: 5ikZo3dXp81Mj9qDegbGNeMJBtzu1DSw6UeZK8o3XKgs
Deploy success
🎉 Congratulations! Your program is now live on Solana devnet!
Interacting with Your Deployed Program
You can interact with your deployed program using the Anchor client:
// Create a new token
const tokenConfig = anchor.web3.Keypair.generate();

const tx = await program.methods
  .createToken("My Awesome Token", "MAT")
  .accounts({
    tokenConfig: tokenConfig.publicKey,
    user: wallet.publicKey,
    systemProgram: anchor.web3.SystemProgram.programId,
  })
  .signers([tokenConfig])
  .rpc();

console.log("Token created! Transaction:", tx);
Current Limitations and Next Steps
Our current implementation is educational and has some intentional limitations:
❌ No user balance tracking - We only track total supply
❌ No transfer functionality - Tokens can't be sent between users
❌ No burning mechanism - Can't reduce token supply
❌ Not SPL Token compatible - Won't work with standard wallets
Making It Production-Ready
To turn this into a production-ready token, you'd need to add:
- User Balance Accounts: Track how many tokens each user owns
- Transfer Instructions: Allow users to send tokens to each other
- SPL Token Integration: Make it compatible with Solana's token standard
- Token Metadata: Add logos, descriptions, and other metadata
- Advanced Features: Burning, freezing, multi-sig authorities
Resources for Continued Learning
- Anchor Documentation - Essential for Solana development
- Solana Cookbook - Practical code examples
Building your first Solana program is an exciting milestone! You now understand the fundamentals of Solana development: accounts, instructions, security, and deployment. This foundation will serve you well as you build more complex applications.
The blockchain space moves fast, but the core concepts you've learned here - secure programming, thorough testing, and careful design - will remain relevant regardless of which platform you choose to build on.
What will you build next? The Solana ecosystem is growing rapidly, and there's room for innovative projects that leverage the platform's speed and low costs.
🔗 Complete source code and implementation details: GitHub Repository
Happy Building 🚀